WinSetView provides an easy way to set Windows File Explorer default folder views. For example, if you want Details view, with a particular selection of column headings enabled across all folders, then WinSetView will do that for you.
If you are like me and stuck having to change folder properties.. this was my lifesaver..
WorldClock is the definitive desktop clock program for Windows. It offers timezone, timesync, alarm, reminder and calendar functionality as well as giving you the option of enhancing your desktop wallpaper with time and weather related information
In some situations, you may need to access an account for which you’ve lost or forgotten a password.
Step 1: Boot to Recovery Mode
Restart your system. Once you see the splash screen for the computer manufacturer, hold down the shift key. The system should come up with a black and white GRUB, or boot menu, with different Linux kernel versions displayed.
Select the second one from the top – the highest revision, followed by (recovery mode). Press Enter.
Step 2: Drop Out to Root Shell
The system should display a menu with different boot options. Use the arrow keys to navigate to the option labeled root and press Enter.
The system should respond by giving you a command-line interface with a prompt.
Step 3: Remount the File System with Write-Permissions
Right now, your system only has read-only access to your system. That means it can look at the data, but cannot make any changes. But we need write-access to change the password, so we’ll need to remount the drive with the appropriate permissions.
At the prompt, type:
mount –o rw,remount /
Press Enter. This should allow you to make changes to the data on the hard drive.
Step 4: Change the Password
At the prompt, type:
passwd username
Substitute the name of the user for username, then press Enter. The system asks you to type a new UNIX password and then to retype it.
Once you’ve entered and confirmed the new password, reboot the system by entering the following:
shutdown –r
Hit Enter, and your system should restart. Don’t press any keys, let the system come up to the login screen, and test to make sure the new password works.
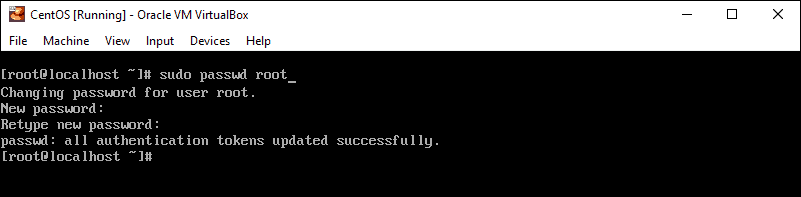
Changing the Root Password in CentOS
Changing a password in CentOS is almost identical to changing it in Ubuntu.
Step 1: Access the Command Line (Terminal)
Right-click the desktop, then left-click Open in Terminal. Or, click Menu > Applications > Utilities > Terminal.
Step 2: Change the Password
At the prompt, type the following, then press Enter:
sudo passwd root
The system should prompt you to enter your existing password. Do so, then follow the prompts to enter and confirm a new root password.
Reset Root Password in CentOS
This is a similar process as in Ubuntu, with a couple of variations.
Step 1: Access Boot Menu
Restart the system, then tap the Esc key about once per second to launch the GRUB menu.
Step 2: Edit Boot Options
Use the arrows to highlight the version of Linux you boot into, then press e.
Use the arrows to highlight the line that starts with kernel or Linux.
Press E.
At the end of the line, add a space then type single. Press Enter, then boot into single-user mode by pressing Ctrl-X or B. (The system will display the command to use.)
Step 3: Remount the Drive
You should have a command line, and you’ll have root privileges. To enable read/write access on your hard drive, type the following:
mount / -o remount,rw
Step 4: Changing the Password
Type the following:
passwd
Press Enter, and the system should prompt you to enter and confirm a new password.
Step 5: Restart
Type the following, pressing enter after each line:
mount / -o remount,ro
sync
reboot
Your system should restart. Confirm that your new password works by logging in.